OK, so you’ve survived the first few cold snaps with no freeze-up problems. However, today you woke up or came home to no water. Since you didn’t have any freeze-up problems before, you can be pretty much assured that your heat tape has gone out. When a heat tape goes, it goes. There’s no fixing it. Just plan on replacing it. The typical life of a properly-installed heat tape is 3-5 years.
Could I have prevented my pipes from freezing? Yes. If someone was home, you could have prevented your pipes from actually freezing if you had installed an alarm on your waterline. The device would have detected that your pipes were nearing the freezing point and sounded an alarm. The alarm is a signal for you to turn on your water so your pipes don’t freeze, and then to investigate your heat tape.
We have a waterline freeze alarm available in our store which is easily installed by the homeowner. The alarm itself is hung inside the home, and a cord runs down and attaches to the waterline.
Selecting the Right Heat Tape to Install
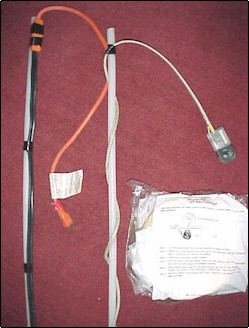
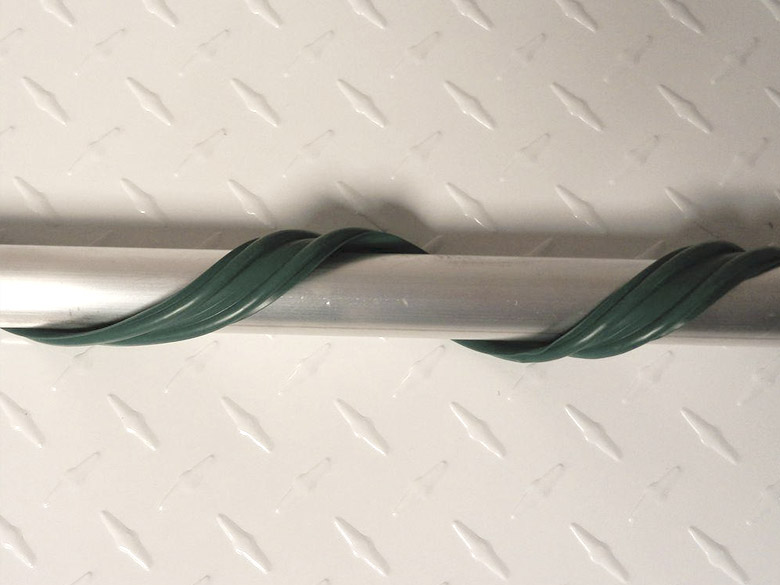
Two styles of heat tapes are available for manufactured homes (see picture). Since most manufactured homes are connected with a plastic-type waterline, you’ll want to be sure that the heat tape you select is approved for plastic water lines. It will be indicated right on the package. The heat tape from Easy Heat is approved for rigid plastic and metal pipes.
Pictured on the left side in the picture is a one-piece flat heat tape with a rubber coating. When installed, this heat tape must run flat along the pipe and cannot overlap itself. On the end near the cord is a thermostat which should solidly touch the pipe. The thermostat should be located on the end of the pipe that will be the coldest. Because the heat tape is coated in rubber, this particular type tends to better resist moisture and last longer than the type we’ll discuss next.
Pictured on the right side of the same picture is a silver-braided type of heat tape. This heat tape is sold by the foot, and when purchased you must also purchase two ends. Because this heat tape is wrapped around the waterline, it’s more difficult to determine exactly how much you’ll need. This heat tape can overlap itself without harm, which makes it safer than most to use. Since there’s no rubber coating, the heat tape tends to rust out and fail with excessive moisture. Dealers and service people love to use this tape as they can buy it in big rolls and use only what they need at any given time.
Also pictured is a roll of fiberglass insulation with a vapor barrier included. When installing, the insulation is rolled on one way, and the vapor barrier rolled on the other way (as shown on bag in picture).
Installing Heat Tape
First, unplug and remove the old heat tape. To remove, take a utility knife and carefully cut away the old vapor barrier and insulation and pull off the heat tape. Don’t try to save any of the insulation or vapor barrier, it’s not worth it. Besides, it may be wet or damp.
Fasten the new heat tape to the waterline per manufacturer instructions. Again, the first picture will give you an idea depending upon which type of heat tape you purchased. Use only manufacturer- approved tape for fastening the heat tape to the waterline. Regular electrical tape is not a good choice. However, some manufacturers have approved certain high-quality electrical tapes which are designed to stand much greater heat than normal electrical tape. When wrapping the tape around the pipe, do not pull too tight as it may pinch the heat tape. Pull the fastening tape snug, but not overly tight.
A heat tape should also not turn any sharp corners. A sharp bend in a heat tape is almost an instant guarantee of failure. When you come to a corner, give the heat tape a little room so it doesn’t have to make a sharp pinch.
Insulating the Water Line
 Once the heat tape is fastened to the waterline, you’ll then want to wrap it with insulation. Use only manufacturer-approved insulation, like the roll you see in the first picture. Starting at one end, wrap the insulation around the waterline until you get to the other end. Then do the same with the vapor barrier, except wrap it the opposite way you wrapped the insulation. As you wrap the insulation and vapor barrier, pull it fairly snug but do not pull it too tight. That’s it, you are done. Go plug in your heat tape and you’ll soon be enjoying running water!
Heat Tape Tips
- Never plug your heat tape in without water in the water lines.
- When done replacing your heat tape, be sure your waterline is not sitting directly on the ground.
- Don’t add any extra insulation to your waterline as it may cause your heat tape to overheat.
- If your waterline extends down into a culvert, run your heat tape down as far as you can reach. After you’ve wrapped the heat tape down in the culvert, shove part of a bat of insulation around the top of the culvert, sealing the top of the culvert against cold air.
- If you’d like to test your heat tape before installing it, stretch it out and plug it in. If your testing it during the summer and have a thermostat, put the end with the thermostat in your freezer.
- A heat tape with a thermostat may take 5-20 minutes before it will turn on.
- If you must use an extension cord to plug in your heat tape, be sure it is of proper size and intended for outdoor use.
- Manufacturers strongly recommended that a heat tape be plugged into a GFCI protected circuit.
- Never plug in a heat tape while it is coiled.
- Never install a heat tape in walls, floors, and ceilings.
- Make sure the brand of heat tape you are buying is suitable for your kind of waterline.
- Always read and save the manufacturer instructions.
You can get heat tape in lengths ranging from 3ft to 80 ft here.