Hey There First Post Here
I purchased a 1973 Mobile Home. I have done some repairs already It was in pretty bad shape. Have replaced old sub-floor with plywood etc. I just got to demoing the bathroom and I plan on installing a fiberglass shower base with a tile up to the ceiling (just in shower). I am going to replace the old sub floor with plywood. Should I tear out the old wood paneling (see pic) and then replace with hardiebacker? Or should i just put hardiebacker over the old wood paneling? Any info would be great!!!
Thanks Tim
Installing New Fiberglass Shower Base
Moderators: Greg, Mark, mhrAJ333, JD
-
xxfesterxx
- Posts: 8
- Joined: Sat Sep 17, 2016 12:53 pm
You do not have the required permissions to view the files attached to this post.
I can't say for certain - but in my experience... water and wood just don't go together. I would definitely get rid of the paneling.
And - while the wall is opened up - check the shower plumbing. I had to tear out an entire wall due to the idiots who built the place only using 1 screw to hold that upper elbow for the shower head. Oh...and the 1 screw was only 1/4 the way in. The entire assembly flopped around alot - and finally the elbow cracked. The high pressure tiny stream shooting out of the elbow burrowed thru the 1/4" drywall....and then the water proceeded to use the vinyl wall paper like a bucket.
And - while the wall is opened up - check the shower plumbing. I had to tear out an entire wall due to the idiots who built the place only using 1 screw to hold that upper elbow for the shower head. Oh...and the 1 screw was only 1/4 the way in. The entire assembly flopped around alot - and finally the elbow cracked. The high pressure tiny stream shooting out of the elbow burrowed thru the 1/4" drywall....and then the water proceeded to use the vinyl wall paper like a bucket.
Opportunity has a shelf life.
-
xxfesterxx
- Posts: 8
- Joined: Sat Sep 17, 2016 12:53 pm
Ok great so remove wood paneling, check plumbing behind wall, install shower base and them put in the hardiebacker?

I would not recommend tile. ANY flexing will cause them to either break or fall off the wall. Most homes of that era had 2x4 wall studs at best if not 2x2. That in my opinion is just not enough to keep them rigid.
Greg
Greg
"If I can't fix it, I can screw it up so bad no one else can either."
As far as order goes..... I would think the backer board goes on the studs behind the pan so that what ever the surface material then sets inside the lip of the pan.xxfesterxx wrote:Ok great so remove wood paneling, check plumbing behind wall, install shower base and them put in the hardiebacker?
Opportunity has a shelf life.
-
Markfothebeast
- Posts: 22
- Joined: Mon Oct 17, 2016 4:38 pm
I am in the same sitution. I gutted the bathroom, hall, and bedroom closet behind the tub. I am putting in a one piece acrylic shower and tub. The only way it was possible to get the tub in was to demolish the walls and remove the new 32" exterior door and frame to fit it through. The cement board or water resistant material you plan to use should sit over the lip of the tub. You can use tub glue in the tube to help seal around the inside of the lip and apply caulking at the seam.
Tile must be installed to thick surfaces such as thick plywood and/or with cement board. This was my first mistake when I tiled our mobile home floor. The 2x4 joists and thin floor plywood caused the tile to crack or come loose due to flex or expansion between the two. I would imagine that the walls are 2x2 in your place unless it was reframed. The wall will flex too easily and you'll have a mess of tiles falling down.
Remove the old paneling. My single piece acrylic tub and shower unit attaches directly to the studs but I suppose it wouldn't hurt to leave paneling there. It just seems like an additional obsticle to potentially collect moisture and perhaps block access to plumbing.
If you've gotten under the floor plywood, check for rotten floor joists. I always add additional support between the joists and some extra screws to the old. It helps fix that spongy and squeaky floor feel.
I'd like to hear how the project is going. I'm framing walls in yet but here's a photo of the one piece tub where it fastens directly to the studs.
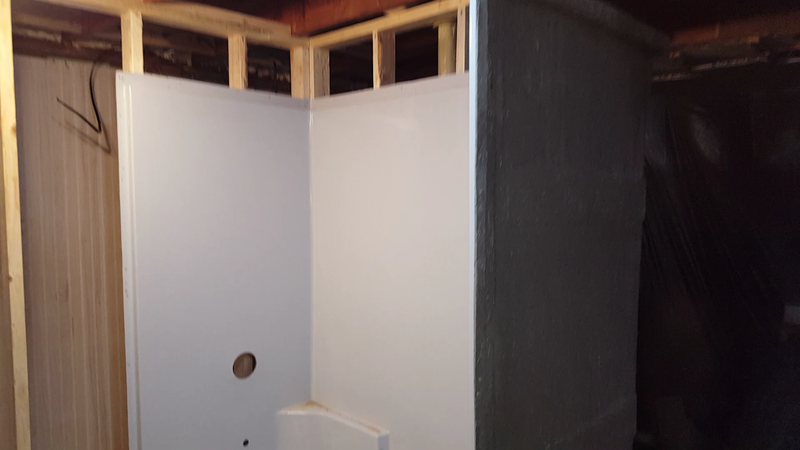

-
xxfesterxx
- Posts: 8
- Joined: Sat Sep 17, 2016 12:53 pm
ok so this is where I am now. I have got the drain aligned and walls torn out etc. I have the directions to install base. Nowhere does it really state on how to secure the the base. The floor is level so I do not really need to put the thin set underneath. Does anyone have any experience with this? Was planning on using sheets of subway tile and use a flexible urethane grout. Will be posting pics shortly!
You do not have the required permissions to view the files attached to this post.
Last edited by xxfesterxx on Wed Nov 09, 2016 8:03 pm, edited 3 times in total.
-
HouseMedic
- Posts: 342
- Joined: Fri Apr 06, 2007 9:14 am
- Location: Delaware
- Contact:
A couple of things.... I would also use a complete three or two piece wall unit with the pan. (you might end up with cracking tile in a mobile home) Also even if the pan is nice and level on the floor a little thinset or even mortar works wonders on making it a lot more solid and stable. Just plop down a few blobs of mortar in a few area's cover the mortat with some light weight plastic (just use the plastic that the pan was in before unpacking if it had any) then push and wiggle the pan down till you get it on the floor again and level. The mortar will fill all the voids. It also eliminates hearing the pan flex and crackle every time you step in it. Usually the pans are just held in by putting in a roofing nail just above the lip of the pans flange in each available stud. Check out youtube for video's on installing them. The instructions should mention all of this.
Ron
Ron
-
xxfesterxx
- Posts: 8
- Joined: Sat Sep 17, 2016 12:53 pm
Ok Great Thank You. I will go ahead and put some thin set underneath the pan. The Pan seems very solid as is. But putting a little under wont hurt. My main concern was securing the base. But multiple people have mention the roofing nail thing. Thanks for that. Would you guys think I am completely nuts for tiling up the wall? I really have my mind set on doing so. Using Sheets of smaller subway tile and the flexible style grout?
-
- Similar Topics
- Replies
- Views
- Last post
-
-
metal border around base of siding
by dsmnightmare » Thu Nov 15, 2018 7:54 pm » in Mobile Home Repair - 2 Replies
- 5077 Views
-
Last post by Greg
Fri Nov 16, 2018 5:12 pm
-
-
-
Underbelly insulated with 3 1/2 in. fiberglass roll insulation.
by Rogerrd4 » Tue Nov 06, 2018 10:10 pm » in Mobile Home Repair - 2 Replies
- 8816 Views
-
Last post by Mark440
Mon Nov 12, 2018 12:43 pm
-
-
-
Help! Installing new storm door and stuck
by jcarr492 » Sun Apr 29, 2018 2:48 pm » in Mobile Home Repair - 3 Replies
- 24399 Views
-
Last post by Greg
Mon Apr 30, 2018 6:54 pm
-
-
- 0 Replies
- 98240 Views
-
Last post by mobtek
Tue Feb 11, 2020 4:19 pm
-
- 1 Replies
- 9870 Views
-
Last post by Greg
Wed Aug 23, 2017 7:39 pm